
Category Archives: Diablo IV

Diablo 4 Shrouded Gift Unique Guide

Unique items continue to define the Diablo 4 endgame, and one of the newest Rogue-focused pieces attracting attention in Season 13 is the Shrouded Gift. This powerful Unique item enhances stealth-based gameplay while adding valuable survivability for Rogue players tackling high-tier content.

If you are looking to optimize your Rogue this season, understanding how Shrouded Gift works and how to farm it efficiently is essential.

What is the Shrouded Gift in Diablo 4?

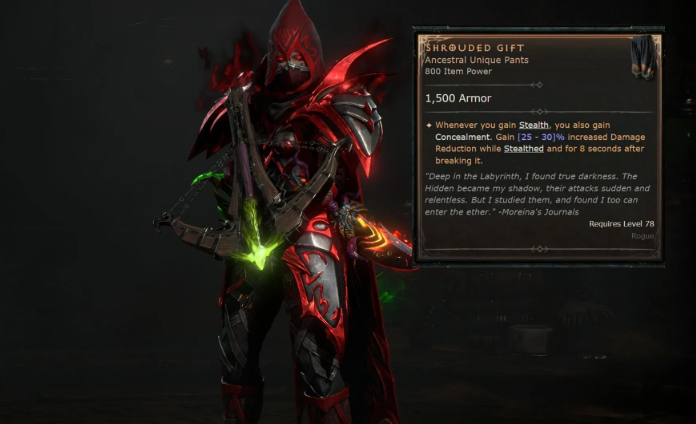
Shrouded Gift is a Rogue-exclusive Unique Pants item introduced in Diablo 4 Season 13. The item is heavily focused on Stealth and Concealment mechanics, giving Rogues stronger defensive capabilities while remaining elusive during combat.

According to the current item databases, the Unique effect reads:

“Whenever you gain Stealth, you also gain Concealment. Gain 25-30% increased Damage Reduction while Stealthed and for 8 seconds after breaking it.” 

This effect creates excellent synergy with several Rogue builds that rely on repositioning, ambush gameplay, and temporary invisibility windows.

Unlike many offensive-focused Diablo 4 Items, Shrouded Gift emphasizes survival and consistency. In high-end content where enemies can eliminate fragile Rogues instantly, the added Damage Reduction becomes extremely valuable.

Why Shrouded Gift Is Strong in Season 13

Season 13 has increased the importance of survivability across all classes. High-tier Pit runs, Nightmare Dungeons, and Infernal activities now punish glass-cannon builds more heavily than before.

That is where Shrouded Gift stands out.

The item allows Rogues to:

·Maintain stealth uptime more effectively

·Gain defensive bonuses after leaving stealth

·Safely reposition during dangerous encounters

·Improve survivability without sacrificing mobility

·Enable stealth-centered build strategies

Community discussions have already highlighted how impactful stealth-focused Unique items can become when paired with optimized Rogue setups.

For players farming endgame Diablo 4 Items, Shrouded Gift offers a refreshing alternative to pure damage-focused gear.

Best Builds That Use Shrouded Gift

Shrouded Gift works best in Rogue builds that naturally trigger Stealth or Concealment repeatedly throughout combat.

1. Concealment Rogue Build

This is the most obvious pairing for the item.

Concealment Rogues rely on entering stealth frequently to reposition, avoid mechanics, and set up massive burst-damage windows.

Shrouded Gift extends the value of these stealth periods by granting substantial Damage Reduction both during and after Concealment.

Core skills often include:

·Concealment

·Dash

·Shadow Step

·Rapid Fire

·Shadow Imbuement

This setup works particularly well for solo endgame players who need additional survivability.

2. Heartseeker Rogue

Heartseeker remains one of the strongest Rogue builds in Season 13, and Shrouded Gift can fit defensive variants of the build surprisingly well.

Because Heartseeker Rogues often rely on mobility and repositioning between enemy packs, the defensive utility from stealth mechanics can improve consistency in difficult Pit pushes.

Players farming Diablo 4 Items for Heartseeker setups frequently prioritize survivability upgrades once their offensive stats are optimized.

3. Shadow Clone Rogue

Shadow Clone builds naturally benefit from stealth interactions, making Shrouded Gift an excellent defensive option.

This setup focuses on:

·Burst assassination gameplay

·Mobility

·Shadow damage scaling

·Temporary stealth windows

When combined with other Rogue Unique items, Shrouded Gift can create a highly evasive playstyle capable of handling difficult elite encounters.

How to Get Shrouded Gift in Diablo 4

Like most high-end Diablo 4 Items, Shrouded Gift is obtained through endgame farming activities.

Current reports indicate several reliable farming methods.

Farm Harbinger of Hatred

Recent community farming guides suggest that Harbinger of Hatred currently offers one of the best chances to target farm Shrouded Gift in Season 13.

This method is currently considered the most efficient approach for dedicated Rogue players.

Nightmare Dungeons

Nightmare Dungeons remain one of the most consistent methods for farming Unique Diablo 4 Items overall.

High-tier dungeons increase your chances of obtaining:

·Unique gear

·Legendary Aspects

·Masterworking materials

·Rare crafting resources

Nightmare Dungeons are especially effective when combined with fast-clearing Rogue builds.

Helltide Events

Helltide farming continues to be a strong source of Unique item drops.

Opening Tortured Gift chests and elite farming during Helltides can reward high-tier loot, including Rogue-specific Unique items.

Many players also use Helltides to gather materials before they buy Diablo IV gold through player trading marketplaces to accelerate gearing progress even further.

Purveyor of Curiosity Gambling

Another option is spending Murmuring Obols at the Purveyor of Curiosity.

Although RNG-heavy, gambling remains a useful supplemental method for farming Diablo 4 Items while completing other activities.

Is Shrouded Gift Worth Using?

For stealth-oriented Rogue builds, the answer is absolutely yes.

While some Unique items struggle to compete against perfectly tempered Legendary gear, community discussions suggest that genuinely build-defining Uniques still hold significant value in Diablo 4.

Shrouded Gift succeeds because its effect changes gameplay rather than simply adding raw stats.

The item provides:

·Strong survivability

·Flexible stealth interactions

·Defensive utility for difficult content

·Excellent synergy with mobility-heavy Rogue builds

If your Rogue build uses Concealment regularly, Shrouded Gift can become one of the best defensive Diablo 4 Items available in Season 13.

Final Thoughts

Shrouded Gift is one of the more interesting Rogue Unique items introduced in Diablo 4 Season 13. Instead of focusing purely on damage inflation, the item rewards tactical stealth gameplay and defensive positioning.

Diablo 4 Guide: The Tyrael’s Might Whirlwind Quake Farmer

The Godslayer Crown has been the go-to for speed farming this season due to its screen-clearing pulls. But what if we take an old favorite, Tyrael’s Might, and combine it with the Barbarian? The result is a speed-farming machine that turns you into a vortex of earthquakes and explosions. If you’re looking to gear up efficiently, you can buy Diablo 4 Gold to accelerate your progress. This guide covers how to set up the Tyrael’s Might variant to achieve massive pull potential, insane movement speed, and a kill streak worthy of the achievement board (9,000+ kills).
Note: This is a Speed Farming build. It excels in Helltides, Nightmare Dungeons, and the Undercity. It is not intended for pushing high-tier endgame content (like high-level Pit pushes).

1. Core Concept: The Synergy

The magic of this build comes from a specific interaction between three key components: Tyrael’s Might, Godslayer Crown, and the Hamstring passive.

· The Pull: The Godslayer Crown was changed to activate “when you attempt to crowd control an enemy.” Even if an enemy is Unstoppable, the pull still happens.

· The Trigger: Tyrael’s Might radiates holy damage as you whirlwind. Every time you hit an enemy, you attempt to apply a status effect.

· The Loop:

1. Berserk Ripping (Aspect) is applied to your gear. It causes any direct damage (including Tyrael’s Might procs) to inflict Bleeding.

2. Hamstring (Skill Tree Passive) causes your Bleeding to apply Slow.

3. Slow counts as Crowd Control.

4. Since you are constantly attempting to crowd control enemies, Godslayer Crown triggers constantly, pulling entire screens of enemies into your Earthquakes.

5. The enemies land in the Earthquakes and die instantly.

2. Gear Setup: The Tyrael’s Might Variant

This setup focuses on the specific Mythics and Aspects required to make the engine work.

SlotItem / AspectReasoning
HelmGodslayer Crown (Mythic)The core of the pull mechanic. Mandatory for the screen-clearing effect.
ChestTyrael’s Might (Mythic)Procs the damage that starts the bleed/slow/pull chain. Provides massive stats and damage reduction.
WeaponsRamaladni’s Magnum Opus (Unique)Your main damage scaler. Ramaladni’s now affects all skills (including Earthquakes). Scale as much Maximum Fury as possible to boost this weapon’s damage.
AmuletMelted Heart of Selig (Mythic)Provides immense survivability and doubles your Fury pool, which synergizes perfectly with Ramaladni’s Magnum Opus.
Ring 1Berserk Ripping (Aspect)Mandatory. This is what converts Tyrael’s Might damage into Bleed, enabling Hamstring and Godslayer Crown.
Ring 2Fists of Fate (Unique)Used for high-end damage variance. Provides Lucky Hit and the chance to apply massive crowd control multipliers.
GlovesAspect of Fierce Winds (or Tempered Affixes)Supports the Earthquake mechanic.

Alternative Gearing Options:

· Ring of Starless Skies: If you find that Fists of Fate isn’t performing well for you, you can swap it out for Starless Skies for better resource management and consistent damage. If you do this, move the Berserk Ripping aspect onto your gloves.

· The Grandfather: While a great weapon, it is not optimal for this specific speed-farming setup. If you want to use it, you will need to find a spot for the Incendiary Fissures aspect to manage fury, which complicates the build. Stick with Ramaladni’s for this variant.

3. Skill Tree & Passives

This setup leverages specific nodes to enable the crowd control loop.

· Hamstring: Located in the skill tree. This is non-negotiable. It makes your Bleeding effects apply Slow, turning Tyrael’s Might into a crowd control tool.

· Whirlwind: Your primary movement and damage application skill.

· Earthquake: Your main source of area damage. This is generated via Aspects or runes.

· Hammer of the Ancients (Enhanced):

1. Crucial Interaction: Cast Enhanced Hammer of the Ancients to gain up to 100 Maximum Fury (if you hit enemies).

2. This massive Fury boost scales directly with Melted Heart of Selig (survivability) and Ramaladni’s Magnum Opus (damage).

3. Note: You are not using Mantle of Mountain’s Fury to explode the quakes. You are simply casting HotA to maintain the Fury buff. The Earthquakes remain on the ground to kill pulled enemies.

4. Iron Skin / Leap:

· The default bar includes Iron Skin for survivability.

· Mobility Swap: If you want infinite mobility (great for Undercity), remove Iron Skin, put Leap on the bar, and equip Chain Scourge Mail (or simply use the Bolts will). This gives Leap zero cooldown. Every time you leap, you proc Tyrael’s Might (spreading damage) and create Earthquakes.

4. Runes & Mechanics

Runes are used to automate your Earthquakes, ensuring they are always under the enemies pulled by Godslayer Crown.

· The Tech Rune (Yul/Tec):

1. Yul (Cooldown Skill) + Tec (Earthquake).

2. Since you are using Leap (with Chain Scourge Mail, it counts as a cooldown skill despite having no cooldown), every Leap will spawn an Earthquake.

3. If you aren’t using Leap, other movement or cooldown skills can be used to spawn these quakes.

4. The Mobility Rune (Mon/Tec):

· Mon (Mobility Skill) + Tec (Earthquake).

· Since Whirlwind and Leap are mobility skills, you will constantly spawn Earthquakes as you move and engage.

5. How to Play the Build

The gameplay loop is designed for speed and minimal downtime.

1. Activate Whirlwind: Start spinning. As you move, Tyrael’s Might will radiate damage.

2. Proc the Pull: The damage from Tyrael’s Might triggers Berserk Ripping (Bleed) -> Hamstring (Slow) -> Godslayer Crown (Pull).

3. Group and Drop Quakes: Enemies from off-screen are vacuumed into your position.

4. Maintain Fury Buff: Cast Hammer of the Ancients once every 5 seconds (or as needed) to maintain the 100 Maximum Fury buff. This keeps your Ramaladni’s damage high and Selig’s tankiness maxed.

5. Leap (Optional): If you specced into Leap, use it to traverse terrain and spawn additional Earthquakes and Tyrael’s Might procs upon landing.

6. Repeat: You never stop moving. Enemies die behind you as they are pulled into the earthquakes you left in your wake.

6. Important Warnings & Limitations

· Not for Pushing: This build relies on constant movement and pulls. In extremely high-tier content, the damage reduction may not be enough, and you will need to swap to stronger, non-mythic variants (dropping Godslayer and Tyrael’s for defensive aspects). If you’re looking to gear up quickly, you can buy cheap Diablo 4 Items from MMOEXP to get the necessary pieces without the grind.

· Life Scaling: If using the Melted Heart of Selig variant, pay close attention to your Maximum Life. Selig converts damage to Fury drain; if your life pool is too low, you will die before your Fury drains. Stack life on gear.

· Skill Tree Variants: The build planner associated with this guide contains multiple variants (Celig variant, Tyrael’s variant). Ensure you select the correct one, as skill trees and paragon boards differ slightly between setups.

Diablo 4 Rustbitten Dirk: A Comprehensive Guide

In the dark and treacherous world of Diablo 4, unique weapons stand out as game-changing tools that can redefine your build’s potential. Among these, the Rustbitten Dirk-a one-handed dagger-has emerged as a niche yet powerful choice for players seeking to dominate single-target encounters. While it may not shine in dense mob crowds, its specialized unique effect makes it a top pick for boss fights and high-tier endgame content. This guide breaks down everything you need to know about the Rustbitten Dirk: its unique effect, how to obtain it, and the best builds to maximize its potential.

The Rustbitten Dirk’s Unique Effect: Dominance Against Isolated Enemies

At the heart of the Rustbitten Dirk’s power is its unique passive effect: it deals 50-100% increased damage to isolated enemies. This multiplier is multiplicative, meaning it stacks with other damage bonuses, turning even moderate builds into boss-slaying powerhouses when used correctly.

It’s crucial to understand what “isolated” means in Diablo 4’s mechanics. An isolated enemy is one that stands alone-no other mobs (trash, elites, or minions) can be within a small radius around it. This strict condition means the Rustbitten Dirk is not ideal for clearing dense packs but excels when you can separate a priority target from its allies.

Beyond its unique effect, the Rustbitten Dirk also boasts impressive base affixes that complement its single-target focus. Typical rolls include +50% damage to close enemies, +51-65 all stats, +424-457 life, +8.3-10% attack speed, and +40-50% vulnerable damage. These affixes enhance its utility, making it a viable weapon even before accounting for its unique passive.

How to Get the Rustbitten Dirk: Farming Strategies and Requirements

The Rustbitten Dirk is not a casual drop-you’ll need to focus on endgame content to increase your chances of obtaining it. It is classified as a non-class specific unique Diablo 4 Items, meaning any class can farm and use it, though some classes benefit from it more than others.

The primary way to farm the Rustbitten Dirk is through high-difficulty endgame activities. Torment Tier 1 and above is required, as lower difficulties have a negligible chance of dropping unique items of this caliber. Nightmare Dungeons, especially high-tier ones, are a reliable source, as they have increased unique drop rates compared to open-world content.

Lair Bosses and the Pinnacle Boss Duriel, King of Maggots, also have a chance to drop the Rustbitten Dirk. To summon Duriel, you’ll need to defeat Echo of Varshan and Grigoire, the Galvanic Saint to collect Shards of Agony, then head to his summoning location in the Gaping Crevasse, east of Gea Kul in Kehjistan.

Seasonal activities also play a role in acquiring the Rustbitten Dirk. During Season of Slaughter, participating in Shrine of Slaughter, Bloodied Nightmare Dungeons, or the Slaughterhouse activity increases your odds of getting this unique dagger. Focusing on bloodied sigils and single-target farming routes (rather than dense mob clears) will further boost your chances.

Best Build Use Cases: Maximizing the Rustbitten Dirk’s Potential

The Rustbitten Dirk’s strength lies in single-target damage, so the best builds for it are those that either specialize in boss fights or can easily separate enemies to trigger its unique effect. While it works with multiple classes, some builds are better suited to leverage its power than others.

Rogue Death Trap Build (Top Pick)

Rogues are the ideal class for the Rustbitten Dirk, especially Death Trap builds. These builds focus on burst damage and crowd control, making it easy to isolate bosses or elite enemies after clearing trash mobs.

In the Rogue Death Trap build, the Rustbitten Dirk replaces the Vehement Brawler’s Aspect dagger for boss-focused phases. Pair it with skills like Death Trap (to group and eliminate adds) and Shadow Step (to quickly close in on isolated targets). The dagger’s attack speed and vulnerable damage affixes synergize perfectly with the Rogue’s high-crit playstyle, turning boss fights into quick, decisive battles.

Sorcerer Boss Finisher Build

Sorcerers can use the Rustbitten Dirk as a “stat stick” and boss finisher. While Sorcerers excel at AOE damage, the dagger’s unique effect allows them to deal massive damage to isolated bosses after clearing surrounding mobs.

Pair the Rustbitten Dirk with skills like Frost Nova (to freeze and separate adds) and Meteor (for initial AOE clear). Once the area is clear, swap to the dagger and use single-target spells like Arcane Orb or Fireball to capitalize on the 50-100% damage boost. The dagger’s all stats and maximum life affixes also help Sorcerers stay alive during close-range boss encounters.

Necromancer and Druid Single-Target Builds

Necromancers can benefit from the Rustbitten Dirk in builds that focus on separating bosses from their minions. Use skills like Corpse Explosion to clear adds, then swap to the dagger to burn down the boss with single-target attacks like Bone Spear.

Druids, particularly those leaning into shapeshifting (e.g., Werewolf or Werebear), can also use the dagger effectively. Clear packs with AOE skills like Tornado or Pulverize, then shift to a single-target form and use the Rustbitten Dirk to finish off isolated elites or bosses. The dagger’s attack speed affix helps Druids maintain their damage output while in shapeshift form.

Final Tips for Using the Rustbitten Dirk

To get the most out of the Rustbitten Dirk, always prioritize clearing adds first-this ensures the boss or elite is isolated and triggers the unique effect. Masterworking and rerolling affixes (focusing on attack speed and vulnerable damage) can further enhance its power.

Remember that the Rustbitten Dirk is a niche weapon. It won’t replace your AOE-focused weapons for clearing dense packs, but it will become your go-to tool for high-tier Nightmare Dungeons, Pinnacle Boss fights, and any encounter where single-target damage is critical. Using cheap Diablo 4 materials can make your weapons even more powerful.

With its powerful unique effect, solid base affixes, and versatility across multiple classes, the Rustbitten Dirk is a must-have for any player looking to conquer Diablo 4’s endgame. By following the farming strategies and build recommendations in this guide, you’ll be able to wield this unique dagger to its full potential and dominate Sanctuary’s deadliest foes.

Diablo 4: Best Auradin Paladin Build Guide

The Auradin Paladin has officially returned in Diablo 4. Alongside the iconic Zealadin, Auradin was one of the most beloved Paladin archetypes-focused on passive damage, overwhelming auras, and effortless map clearing.

This guide covers how the build works, optimal skill rotation, talents, mercenaries, gear, and Paragon boards to help you dominate Sanctuary with minimal effort.

How Does an Auradin Paladin Work in Diablo 4?

The Auradin Paladin revolves around stacking and activating powerful Auras that deal consistent area damage while enhancing survivability and mobility.

Important: This build requires the unique item Dawnfire to function properly. Do not fully commit to Auradin until you have it.

Core Auras Used in the Auradin Build

As expected, auras are the backbone of this build. You will actively maintain three key auras:

·Holy Light Aura – Your primary damage source, continuously burning down enemies.

·Fanaticism Aura – Boosts attack speed and overall damage scaling.

·Defiance Aura – Provides significant defensive bonuses, increasing survivability.

You should activate these auras off cooldown whenever possible to maintain maximum uptime and damage.

Ideal Auradin Paladin Skill Rotation

The Auradin playstyle is intentionally simple, making it ideal for relaxed farming sessions.

Core Rotation:

1. Use Falling Star and Arbiter of Justice to enter and maintain Arbiter Form.

2. Activate all Auras whenever they come off cooldown.

3. Use Consecration when facing dense enemy packs or bosses.

4. Stay mobile-your damage happens automatically.

5. Stand near enemies and let your auras do the work.

For bosses and tougher encounters, layer Consecration beneath enemies while maintaining Arbiter Form for consistent pressure. Pair this with Diablo 4 Items that enhance Aura effects for maximum efficiency.

Recommended Hotbar Setup

Your hotbar should include the following abilities:

·Arbiter of Justice

·Defiance Aura

·Consecration

·Falling Star

·Holy Light Aura

·Fanaticism Aura

This setup ensures maximum uptime on Arbiter Form, auras, and area control. Players who want to skip grinding can also buy Diablo IV Items that provide the same aura boosts.

Best Talents and Oath for Auradin Paladin

The Auradin Paladin benefits heavily from defensive scaling. Your Key Passive is Coat of Arms, which increases damage based on Armor and Block Chance. This creates a perfect synergy: the tankier you become, the harder you hit.

Best Oath: Disciple Oath

The Disciple Oath is mandatory for this build, as it enables Arbiter Form usage. With multiple ways to trigger Arbiter Form, you’ll rarely find yourself without access to its massive mobility and damage bonuses.

Best Mercenary for Auradin Paladin

Primary Mercenary: Varyana

Varyana is the best mercenary choice for Auradin Paladins due to her healing and reliable combat support.

Recommended Varyana Skills:

·Cleave

·Recklessness

·Whirlwind

·Taste of Flesh

She helps keep you healthy while contributing meaningful damage during fights.

Secondary Mercenary: Aldkin

Aldkin is an excellent backup option, primarily for utility.

Recommended Skill:

·Field of Languish (plus any combat ability)

Avoid Raheir, as Paladins are already tanky and gain little from Bastion.

Best Gear, Uniques, Aspects, and Rune Words

Required and Recommended Uniques

·Dawnfire (Required)

·Griswold’s Opus

·Herald of Zakarum

·Godslayer Crown (Optional)

If you find a high-quality multi-Greater Affix helmet, it can replace the Godslayer Crown. As you progress into the deep endgame, aim for:

·Heir of Perdition

·Shroud of False Death

Best Rune Words

·Neo + Ceh – Avoid health damage for 2 seconds to summon Spirit Wolves.

·Nagu + Que – Maintain at least one active summon for 5 seconds to invoke Druid’s Earthen Bulwark.

These Rune Words synergize perfectly, providing defensive layers and additional damage sources.

Auradin Paladin Paragon Boards Explained

Paragon progression is critical for maximizing Auradin damage and survivability. You should prioritize upgrading Paragon Boards through The Pit, aiming for at least level 46 to unlock Legendary upgrades.

Recommended Paragon Path

·Starting Board – Spirit Glyph

·Castle Board – Challenger Glyph (2 rotations)

·Relentless Board – Judicator Glyph (2 rotations)

·Preacher Board – Exploit Glyph (2 rotations)

·Shield Bearer Board – Canny Glyph (3 rotations)

The Castle board is especially powerful, as its Legendary Node increases damage based on Armor-perfect synergy with Coat of Arms.

Final Thoughts on the Auradin Paladin

The Auradin Paladin is one of the most comfortable and efficient builds in Diablo 4. With minimal button presses, massive area damage, and exceptional survivability, it excels at both speed farming and endgame pushing. If you loved Auradin in Diablo 2-or simply want a low-effort, high-reward build-this modern Diablo 4 version is absolutely worth playing.

Diablo 4 Season 9:Top 5 Thorns Builds to Try

Thorns in Diablo 4 has evolved from a purely defensive mechanic into a fully offensive strategy. Season 9 introduces unique items and updates that let Thorns become a core damage-dealing playstyle across multiple classes. Whether you want a tanky bruiser, a poison-spewing hybrid, or a legion of thorn-armored minions, these builds can compete with the game strongest setups.

Here are the five best Thorns builds to dominate Torment II and III content in Season 9.

1.Bash Barbarian – The Classic Thorns Juggernaut

    The Bash Barbarian is a durable, reliable Thorns build that excels at boss fights and crowd control. Using Bash and Ground Stomp, combined with Earthquake aspects and Challenging Shout, you’ll reflect enormous damage while stunning enemies.Protect your Diablo 4 gold with the trusted services of MMOexp today.

    Highlights:

    High single-target damage, perfect for Pit pushing

    Tanky with self-sustaining shouts and defensive mitigation

    Razorplate amplifies passive Thorns damage

    Key Gear & Aspects:

    Razorplate – core for Thorns output

    Ancient’s Oath – boosts Steel Grasp chains

    Aspect of the Ancestral Force

    Bold Chieftain’s Aspect – reduces shout cooldowns

    2.Poison Thorns Spiritborn (Rake Variant)

      This hybrid build merges Thorns with Poison damage, providing incredible AoE and burst potential. Balazan’s Maxtlatl converts Thorns into Poison, while Quill Volley or Rake delivers fast attacks. When paired with Noxious Resonance, it becomes a screen-clearing powerhouse.

      Highlights:

      Explosive poison damage via Thorns procs

      Scales well with Crit Chance and Attack Speed

      Ideal for elites and bosses

      Key Gear & Aspects:

      Balazan Maxtlatl – converts Thorns to Poison

      Loyalty Mantle – doubles Spirit Hall bonuses

      Razorplate

      Aspect of Plains Power

      Fell Soothsayer Aspect

      3.Rock Splitter Gorilla Spiritborn

        The Gorilla Spiritborn triggers Thorns through Gorilla Spirit Skills, producing massive damage bursts while remaining tanky. Gorilla x2 Spirit Halls and Loyalty Mantle help you reflect 100% Thorns damage while maintaining a defensive barrier.

        Highlights:

        Massive Thorns bursts from Gorilla skills

        Tanky and consistent, perfect for solo play

        Smooth rotations and strong battlefield control

        Key Gear & Aspects:

        Razorplate

        Balazan Maxtlatl

        Loyalty Mantle

        Sepazontec – boosts Thorns uptime

        Aspect of the Moonrise

        Seal of Denial – adds Barrier and Fortify scaling with Thorns

        4.Leap Thorns Barbarian

          This build blends mobility and Thorns damage, letting you Leap directly into mobs while reflecting damage. By using Fury generation, Challenging Shout, and Revenge Glyphs, you maintain high damage while staying agile.

          Highlights:

          Highly mobile Thorns build

          Flexible, ideal for clearing dense packs

          Fury-spending scales Thorns damage efficiently

          Key Gear & Aspects:

          Razorplate

          Barbed Carapace – Fury-based Thorns scaling

          Outburst – Thorns scales with max life

          Needlefare Aspect – extra Thorns procs

          Death Wish Aspect – boosts damage while Berserking

          5.Thorns Minion Necromancer

            The Thorns Minion Necromancer lets your summons do the heavy lifting. With Spiked Armor, Razorplate, and the Book of the Dead, your minions inherit your Thorns damage, letting skeletons and golems punish enemies while you stay safe.

            Highlights:

            Minions inherit 50% of your Thorns damage

            Great for defensive, low-risk gameplay

            Scales excellently in AoE and Pit content

            Key Gear & Aspects:

            Razorplate

            Spiked Armor – boosts Armor, Thorns, and Block

            Bristleback Aspect

            Blood Moon Breeches

            Sticker-thought Aspect – optional if using Decompose

            Quick Build Recommendations

            Top Overall:Bash Barbarian – raw power and versatility

            Best Mobility:Leap + Whirlwind Barbarian

            Most Unique:Poison Thorns Spiritborn – hybrid playstyle

            Best Survivability:Minion Necromancer – stay out of harm’s way

            Best New Synergy:Gorilla Spiritborn + Balazan’s Maxtlatl – full Thorns-to-Poison conversion

            From unstoppable Barbarian fury to precise Spiritborn bursts, Thorns builds are stronger than ever in Diablo 4 Season 9.Get your buy Diablo 4 Items from MMOexp today and dominate every battle with confidence! Gear up, equip your Razorplate, stack damage multipliers, and watch your enemies destroy themselves.