
Tag Archives: Diablo 4 Items

Diablo 4 Shrouded Gift Unique Guide

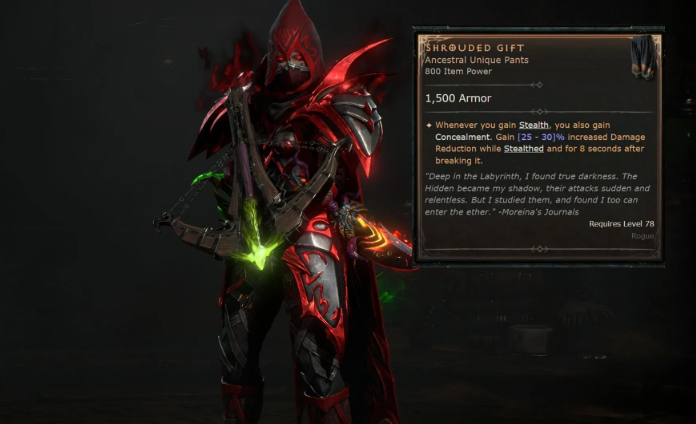
Unique items continue to define the Diablo 4 endgame, and one of the newest Rogue-focused pieces attracting attention in Season 13 is the Shrouded Gift. This powerful Unique item enhances stealth-based gameplay while adding valuable survivability for Rogue players tackling high-tier content.

If you are looking to optimize your Rogue this season, understanding how Shrouded Gift works and how to farm it efficiently is essential.

What is the Shrouded Gift in Diablo 4?

Shrouded Gift is a Rogue-exclusive Unique Pants item introduced in Diablo 4 Season 13. The item is heavily focused on Stealth and Concealment mechanics, giving Rogues stronger defensive capabilities while remaining elusive during combat.

According to the current item databases, the Unique effect reads:

“Whenever you gain Stealth, you also gain Concealment. Gain 25-30% increased Damage Reduction while Stealthed and for 8 seconds after breaking it.” 

This effect creates excellent synergy with several Rogue builds that rely on repositioning, ambush gameplay, and temporary invisibility windows.

Unlike many offensive-focused Diablo 4 Items, Shrouded Gift emphasizes survival and consistency. In high-end content where enemies can eliminate fragile Rogues instantly, the added Damage Reduction becomes extremely valuable.

Why Shrouded Gift Is Strong in Season 13

Season 13 has increased the importance of survivability across all classes. High-tier Pit runs, Nightmare Dungeons, and Infernal activities now punish glass-cannon builds more heavily than before.

That is where Shrouded Gift stands out.

The item allows Rogues to:

·Maintain stealth uptime more effectively

·Gain defensive bonuses after leaving stealth

·Safely reposition during dangerous encounters

·Improve survivability without sacrificing mobility

·Enable stealth-centered build strategies

Community discussions have already highlighted how impactful stealth-focused Unique items can become when paired with optimized Rogue setups.

For players farming endgame Diablo 4 Items, Shrouded Gift offers a refreshing alternative to pure damage-focused gear.

Best Builds That Use Shrouded Gift

Shrouded Gift works best in Rogue builds that naturally trigger Stealth or Concealment repeatedly throughout combat.

1. Concealment Rogue Build

This is the most obvious pairing for the item.

Concealment Rogues rely on entering stealth frequently to reposition, avoid mechanics, and set up massive burst-damage windows.

Shrouded Gift extends the value of these stealth periods by granting substantial Damage Reduction both during and after Concealment.

Core skills often include:

·Concealment

·Dash

·Shadow Step

·Rapid Fire

·Shadow Imbuement

This setup works particularly well for solo endgame players who need additional survivability.

2. Heartseeker Rogue

Heartseeker remains one of the strongest Rogue builds in Season 13, and Shrouded Gift can fit defensive variants of the build surprisingly well.

Because Heartseeker Rogues often rely on mobility and repositioning between enemy packs, the defensive utility from stealth mechanics can improve consistency in difficult Pit pushes.

Players farming Diablo 4 Items for Heartseeker setups frequently prioritize survivability upgrades once their offensive stats are optimized.

3. Shadow Clone Rogue

Shadow Clone builds naturally benefit from stealth interactions, making Shrouded Gift an excellent defensive option.

This setup focuses on:

·Burst assassination gameplay

·Mobility

·Shadow damage scaling

·Temporary stealth windows

When combined with other Rogue Unique items, Shrouded Gift can create a highly evasive playstyle capable of handling difficult elite encounters.

How to Get Shrouded Gift in Diablo 4

Like most high-end Diablo 4 Items, Shrouded Gift is obtained through endgame farming activities.

Current reports indicate several reliable farming methods.

Farm Harbinger of Hatred

Recent community farming guides suggest that Harbinger of Hatred currently offers one of the best chances to target farm Shrouded Gift in Season 13.

This method is currently considered the most efficient approach for dedicated Rogue players.

Nightmare Dungeons

Nightmare Dungeons remain one of the most consistent methods for farming Unique Diablo 4 Items overall.

High-tier dungeons increase your chances of obtaining:

·Unique gear

·Legendary Aspects

·Masterworking materials

·Rare crafting resources

Nightmare Dungeons are especially effective when combined with fast-clearing Rogue builds.

Helltide Events

Helltide farming continues to be a strong source of Unique item drops.

Opening Tortured Gift chests and elite farming during Helltides can reward high-tier loot, including Rogue-specific Unique items.

Many players also use Helltides to gather materials before they buy Diablo IV gold through player trading marketplaces to accelerate gearing progress even further.

Purveyor of Curiosity Gambling

Another option is spending Murmuring Obols at the Purveyor of Curiosity.

Although RNG-heavy, gambling remains a useful supplemental method for farming Diablo 4 Items while completing other activities.

Is Shrouded Gift Worth Using?

For stealth-oriented Rogue builds, the answer is absolutely yes.

While some Unique items struggle to compete against perfectly tempered Legendary gear, community discussions suggest that genuinely build-defining Uniques still hold significant value in Diablo 4.

Shrouded Gift succeeds because its effect changes gameplay rather than simply adding raw stats.

The item provides:

·Strong survivability

·Flexible stealth interactions

·Defensive utility for difficult content

·Excellent synergy with mobility-heavy Rogue builds

If your Rogue build uses Concealment regularly, Shrouded Gift can become one of the best defensive Diablo 4 Items available in Season 13.

Final Thoughts

Shrouded Gift is one of the more interesting Rogue Unique items introduced in Diablo 4 Season 13. Instead of focusing purely on damage inflation, the item rewards tactical stealth gameplay and defensive positioning.

Diablo 4 Rustbitten Dirk: A Comprehensive Guide

In the dark and treacherous world of Diablo 4, unique weapons stand out as game-changing tools that can redefine your build’s potential. Among these, the Rustbitten Dirk-a one-handed dagger-has emerged as a niche yet powerful choice for players seeking to dominate single-target encounters. While it may not shine in dense mob crowds, its specialized unique effect makes it a top pick for boss fights and high-tier endgame content. This guide breaks down everything you need to know about the Rustbitten Dirk: its unique effect, how to obtain it, and the best builds to maximize its potential.

The Rustbitten Dirk’s Unique Effect: Dominance Against Isolated Enemies

At the heart of the Rustbitten Dirk’s power is its unique passive effect: it deals 50-100% increased damage to isolated enemies. This multiplier is multiplicative, meaning it stacks with other damage bonuses, turning even moderate builds into boss-slaying powerhouses when used correctly.

It’s crucial to understand what “isolated” means in Diablo 4’s mechanics. An isolated enemy is one that stands alone-no other mobs (trash, elites, or minions) can be within a small radius around it. This strict condition means the Rustbitten Dirk is not ideal for clearing dense packs but excels when you can separate a priority target from its allies.

Beyond its unique effect, the Rustbitten Dirk also boasts impressive base affixes that complement its single-target focus. Typical rolls include +50% damage to close enemies, +51-65 all stats, +424-457 life, +8.3-10% attack speed, and +40-50% vulnerable damage. These affixes enhance its utility, making it a viable weapon even before accounting for its unique passive.

How to Get the Rustbitten Dirk: Farming Strategies and Requirements

The Rustbitten Dirk is not a casual drop-you’ll need to focus on endgame content to increase your chances of obtaining it. It is classified as a non-class specific unique Diablo 4 Items, meaning any class can farm and use it, though some classes benefit from it more than others.

The primary way to farm the Rustbitten Dirk is through high-difficulty endgame activities. Torment Tier 1 and above is required, as lower difficulties have a negligible chance of dropping unique items of this caliber. Nightmare Dungeons, especially high-tier ones, are a reliable source, as they have increased unique drop rates compared to open-world content.

Lair Bosses and the Pinnacle Boss Duriel, King of Maggots, also have a chance to drop the Rustbitten Dirk. To summon Duriel, you’ll need to defeat Echo of Varshan and Grigoire, the Galvanic Saint to collect Shards of Agony, then head to his summoning location in the Gaping Crevasse, east of Gea Kul in Kehjistan.

Seasonal activities also play a role in acquiring the Rustbitten Dirk. During Season of Slaughter, participating in Shrine of Slaughter, Bloodied Nightmare Dungeons, or the Slaughterhouse activity increases your odds of getting this unique dagger. Focusing on bloodied sigils and single-target farming routes (rather than dense mob clears) will further boost your chances.

Best Build Use Cases: Maximizing the Rustbitten Dirk’s Potential

The Rustbitten Dirk’s strength lies in single-target damage, so the best builds for it are those that either specialize in boss fights or can easily separate enemies to trigger its unique effect. While it works with multiple classes, some builds are better suited to leverage its power than others.

Rogue Death Trap Build (Top Pick)

Rogues are the ideal class for the Rustbitten Dirk, especially Death Trap builds. These builds focus on burst damage and crowd control, making it easy to isolate bosses or elite enemies after clearing trash mobs.

In the Rogue Death Trap build, the Rustbitten Dirk replaces the Vehement Brawler’s Aspect dagger for boss-focused phases. Pair it with skills like Death Trap (to group and eliminate adds) and Shadow Step (to quickly close in on isolated targets). The dagger’s attack speed and vulnerable damage affixes synergize perfectly with the Rogue’s high-crit playstyle, turning boss fights into quick, decisive battles.

Sorcerer Boss Finisher Build

Sorcerers can use the Rustbitten Dirk as a “stat stick” and boss finisher. While Sorcerers excel at AOE damage, the dagger’s unique effect allows them to deal massive damage to isolated bosses after clearing surrounding mobs.

Pair the Rustbitten Dirk with skills like Frost Nova (to freeze and separate adds) and Meteor (for initial AOE clear). Once the area is clear, swap to the dagger and use single-target spells like Arcane Orb or Fireball to capitalize on the 50-100% damage boost. The dagger’s all stats and maximum life affixes also help Sorcerers stay alive during close-range boss encounters.

Necromancer and Druid Single-Target Builds

Necromancers can benefit from the Rustbitten Dirk in builds that focus on separating bosses from their minions. Use skills like Corpse Explosion to clear adds, then swap to the dagger to burn down the boss with single-target attacks like Bone Spear.

Druids, particularly those leaning into shapeshifting (e.g., Werewolf or Werebear), can also use the dagger effectively. Clear packs with AOE skills like Tornado or Pulverize, then shift to a single-target form and use the Rustbitten Dirk to finish off isolated elites or bosses. The dagger’s attack speed affix helps Druids maintain their damage output while in shapeshift form.

Final Tips for Using the Rustbitten Dirk

To get the most out of the Rustbitten Dirk, always prioritize clearing adds first-this ensures the boss or elite is isolated and triggers the unique effect. Masterworking and rerolling affixes (focusing on attack speed and vulnerable damage) can further enhance its power.

Remember that the Rustbitten Dirk is a niche weapon. It won’t replace your AOE-focused weapons for clearing dense packs, but it will become your go-to tool for high-tier Nightmare Dungeons, Pinnacle Boss fights, and any encounter where single-target damage is critical. Using cheap Diablo 4 materials can make your weapons even more powerful.

With its powerful unique effect, solid base affixes, and versatility across multiple classes, the Rustbitten Dirk is a must-have for any player looking to conquer Diablo 4’s endgame. By following the farming strategies and build recommendations in this guide, you’ll be able to wield this unique dagger to its full potential and dominate Sanctuary’s deadliest foes.

Diablo 4: Best Auradin Paladin Build Guide

The Auradin Paladin has officially returned in Diablo 4. Alongside the iconic Zealadin, Auradin was one of the most beloved Paladin archetypes-focused on passive damage, overwhelming auras, and effortless map clearing.

This guide covers how the build works, optimal skill rotation, talents, mercenaries, gear, and Paragon boards to help you dominate Sanctuary with minimal effort.

How Does an Auradin Paladin Work in Diablo 4?

The Auradin Paladin revolves around stacking and activating powerful Auras that deal consistent area damage while enhancing survivability and mobility.

Important: This build requires the unique item Dawnfire to function properly. Do not fully commit to Auradin until you have it.

Core Auras Used in the Auradin Build

As expected, auras are the backbone of this build. You will actively maintain three key auras:

·Holy Light Aura – Your primary damage source, continuously burning down enemies.

·Fanaticism Aura – Boosts attack speed and overall damage scaling.

·Defiance Aura – Provides significant defensive bonuses, increasing survivability.

You should activate these auras off cooldown whenever possible to maintain maximum uptime and damage.

Ideal Auradin Paladin Skill Rotation

The Auradin playstyle is intentionally simple, making it ideal for relaxed farming sessions.

Core Rotation:

1. Use Falling Star and Arbiter of Justice to enter and maintain Arbiter Form.

2. Activate all Auras whenever they come off cooldown.

3. Use Consecration when facing dense enemy packs or bosses.

4. Stay mobile-your damage happens automatically.

5. Stand near enemies and let your auras do the work.

For bosses and tougher encounters, layer Consecration beneath enemies while maintaining Arbiter Form for consistent pressure. Pair this with Diablo 4 Items that enhance Aura effects for maximum efficiency.

Recommended Hotbar Setup

Your hotbar should include the following abilities:

·Arbiter of Justice

·Defiance Aura

·Consecration

·Falling Star

·Holy Light Aura

·Fanaticism Aura

This setup ensures maximum uptime on Arbiter Form, auras, and area control. Players who want to skip grinding can also buy Diablo IV Items that provide the same aura boosts.

Best Talents and Oath for Auradin Paladin

The Auradin Paladin benefits heavily from defensive scaling. Your Key Passive is Coat of Arms, which increases damage based on Armor and Block Chance. This creates a perfect synergy: the tankier you become, the harder you hit.

Best Oath: Disciple Oath

The Disciple Oath is mandatory for this build, as it enables Arbiter Form usage. With multiple ways to trigger Arbiter Form, you’ll rarely find yourself without access to its massive mobility and damage bonuses.

Best Mercenary for Auradin Paladin

Primary Mercenary: Varyana

Varyana is the best mercenary choice for Auradin Paladins due to her healing and reliable combat support.

Recommended Varyana Skills:

·Cleave

·Recklessness

·Whirlwind

·Taste of Flesh

She helps keep you healthy while contributing meaningful damage during fights.

Secondary Mercenary: Aldkin

Aldkin is an excellent backup option, primarily for utility.

Recommended Skill:

·Field of Languish (plus any combat ability)

Avoid Raheir, as Paladins are already tanky and gain little from Bastion.

Best Gear, Uniques, Aspects, and Rune Words

Required and Recommended Uniques

·Dawnfire (Required)

·Griswold’s Opus

·Herald of Zakarum

·Godslayer Crown (Optional)

If you find a high-quality multi-Greater Affix helmet, it can replace the Godslayer Crown. As you progress into the deep endgame, aim for:

·Heir of Perdition

·Shroud of False Death

Best Rune Words

·Neo + Ceh – Avoid health damage for 2 seconds to summon Spirit Wolves.

·Nagu + Que – Maintain at least one active summon for 5 seconds to invoke Druid’s Earthen Bulwark.

These Rune Words synergize perfectly, providing defensive layers and additional damage sources.

Auradin Paladin Paragon Boards Explained

Paragon progression is critical for maximizing Auradin damage and survivability. You should prioritize upgrading Paragon Boards through The Pit, aiming for at least level 46 to unlock Legendary upgrades.

Recommended Paragon Path

·Starting Board – Spirit Glyph

·Castle Board – Challenger Glyph (2 rotations)

·Relentless Board – Judicator Glyph (2 rotations)

·Preacher Board – Exploit Glyph (2 rotations)

·Shield Bearer Board – Canny Glyph (3 rotations)

The Castle board is especially powerful, as its Legendary Node increases damage based on Armor-perfect synergy with Coat of Arms.

Final Thoughts on the Auradin Paladin

The Auradin Paladin is one of the most comfortable and efficient builds in Diablo 4. With minimal button presses, massive area damage, and exceptional survivability, it excels at both speed farming and endgame pushing. If you loved Auradin in Diablo 2-or simply want a low-effort, high-reward build-this modern Diablo 4 version is absolutely worth playing.

Diablo 4 Season 9: Best Builds for Infernal Hordes

Diablo 4 Season 9: Sins of the Horadrim has reshaped the endgame by introducing new mechanics, Uniques, and high-octane activities. Among the most exciting additions is the Infernal Hordes, a wave-based challenge that pits players against relentless enemies in the Realm of Hatred. To access this event, you’ll need an Infernal Compass, and once inside, you’ll face waves of demons, gather Burning Aether, and battle the Fell Council for some of the best loot in the game.

This activity is fast-paced and rewards efficiency: you’ll have 60 seconds per wave to slay as many monsters as possible while collecting Aether. After surviving enough waves, you’ll face off against the Fell Council in a climactic encounter that tests both your damage and survivability. Since loot at the end depends on how much Burning Aether you’ve earned, optimizing your build is essential.

This guide covers the best Infernal Horde builds in Diablo 4 Season 9, their key Diablo IV Items, and why they thrive in this unique endgame mode.

Why Buildings Matter in Infernal Hordes

Unlike other content, Infernal Hordes require constant AoE (area of effect) damage, strong crowd control, and wave-clearing speed. Every second counts: mobs spawn endlessly, and you must balance raw power with survivability. Builds that perform best here usually share three qualities:

1. AoE dominance – clearing huge packs efficiently.

2. Mobility – repositioning quickly between spawns.

3. Sustain or passive damage – minimizing downtime while farming waves.

With that in mind, let’s break down the top builds for Diablo 4 Season 9 Infernal Hordes.

1. Hydra Sorcerer – Pyromancer’s Playground

·Key Item: Ophidian Iris (Unique Amulet)

·Playstyle: Stationary turret DPS with screen-wide AoE.

·Strengths: Hands-free damage, excellent scaling, Pyromancy synergy.

The Hydra Sorcerer has become a meta-defining build thanks to Season 9’s new Ophidian Iris amulet. This item turns Hydra into a Core Skill, always summoning a three-headed beast whose attacks explode on impact. Additional Hydra heads increase the summon’s size and damage, making this build devastating in wave content.

Hydras do the work for you, melting mobs while you focus on mobility and defensive cooldowns. With proper setup, you’ll cover the map with fiery explosions and constant AoE.

Recommended Aspects & Skills:

·Serpentine Aspect – extends Hydra duration.

·Fireball Enchantment – for passive AoE explosions.

·Flame Shield – emergency survivability.

·Inferno (Ultimate) – for grouping enemies into Hydra burn zones.

This build is perfect for Infernal Hordes because Hydras can clear multiple spawn points simultaneously, ensuring you maximize Burning Aether collection.

2. Quill Volley Spiritborn (Poison) – Burst & Sustain Hybrid

·Key Item: Rod of Kepeleke (Unique Weapon)

·Playstyle: Ranged AoE with guaranteed crits.

·Strengths: Huge poison coverage, strong mobility, high scaling potential.

The new Spiritborn class shines in Infernal Hordes, and the Quill Volley Poison build is its flagship setup. With the Rod of Kepeleke, Quill Volley becomes a max-size, auto-crit, basic skill. This lets you spam massive volleys of poison-tipped quills across the battlefield.

The poison DoTs (damage-over-time effects) stack endlessly, creating waves of toxic damage that persist even as you kite or reposition. This makes the build excellent for controlling space in the confined maps of Infernal Hordes.

Recommended Gear Priorities:

·Poison DoT multipliers.

·Increased Basic Skill Attack Speed.

·Energy Regeneration/Cooldown Reduction for uptime.

For wave clearing and boss fights alike, this build offers an ideal mix of burst AoE and sustained DPS.

3. Pulverize Druid – Poison Earthquake Combo

·Key Item: Rotting Lightbringer (Unique Mace)

·Playstyle: Overpower-focused AoE with poison synergy.

·Strengths: Beginner-friendly, tanky, early/mid-game powerhouse.

The Pulverize Druid continues to be a fan-favorite in Season 9, now enhanced by the Rotting Lightbringer. This mace makes every Overpower trigger a 600% poison burst over 7 seconds, turning your Pulverize into an earth-shattering wave-clearer.

The build’s simplicity and natural tankiness make it ideal for players learning the Infernal Horde mechanics. Though slower than Rogues or Sorcerers, the durability and poison AoE explosions make it reliable even in higher-tier waves.

Best Aspects & Skills:

·Ursine Strength – boosts Overpower scaling.

·Poison Creeper – roots and groups mobs.

·Blood Howl – for sustain and Fury regen.

If you’re entering Infernal Hordes without fully optimized gear, this is one of the safest and most effective choices.

4. Balazan’s Poison Rake Spiritborn – The Thorns Death Machine

·Key Items: Razorplate (armor) + Balazan’s Maxtlatl (Unique weapon)

·Playstyle: Thorns/Poison hybrid that punishes enemies for attacking.

·Strengths: Semi-passive gameplay, incredible survivability, great for farming.

This Thorns Spiritborn build flips the script: instead of actively dealing damage, you punish enemies for hitting you. By combining Razorplate’s massive Thorns bonus with Balazan’s Maxtlatl, which converts Thorns into poison damage, enemies essentially kill themselves while you stand your ground.

It’s especially effective in Infernal Hordes, where waves of melee mobs rush you constantly. The more they swarm, the faster they die. However, you’ll need to watch out for ranged enemies, as they can bypass your Thorns advantage.

Recommended Stats:

·Increased Thorns %.

·Poison Duration/DoT scaling.

·Defensive affixes like Damage Reduction vs Close.

This build is ideal for low-APM farming and marathon Infernal Horde sessions, though it lacks high burst damage.

5. Blood Wave Necromancer – Corpse Explosion Overload

·Key Items: Kessime’s Legacy (Unique Pants), Tidal Aspect.

·Playstyle: Wide AoE wave spam with corpse synergies.

·Strengths: Safe, consistent, excellent mob grouping.

The Blood Wave Necromancer remains one of the most reliable Infernal Horde builds despite nerfs. Using Tidal Aspect, you can summon multiple Blood Waves at once, while Kessime’s Legacy pulls mobs into your waves and corpse explosions.

This build excels at controlling the screen, creating bottlenecks that make wave farming highly efficient. It’s less burst-heavy than Hydra or Rogue builds but offers one of the safest playstyles thanks to ranged AoE and crowd control.

Best Enhancements:

·Corpse Explosion Damage.

·Essence Regeneration.

·Cooldown Reduction for Blood Skills.

Perfect for mid-tier Horde farming, though it may fall off at the very top end.

6. Whirlwind Quake Barbarian – Spinning Earthquake Juggernaut

·Key Item: Aspect of the Quaking Rage.

·Playstyle: Constant Whirlwind AoE with quake synergy.

·Strengths: Durable, mobile, strong, sustained DPS.

For players who enjoy fast-paced melee AoE, the Whirlwind Quake Barbarian is unmatched. By combining Whirlwind’s Fury generation with quake procs, you create a nonstop earthquake zone around your Barbarian.

The build isn’t as flashy as Sorcerer nuke, but it makes up for it with smooth gameplay, durability, and mobility. With proper Fury management, you can chain Whirlwind + Quake infinitely, mowing down Infernal Hordes while barely slowing down.

Key Aspects:

·Quaking Rage – core damage engine.

·Limitless Rage – resource sustain.

·Weapon Master’s Aspect – added flexibility.

This is one of the most enjoyable Infernal Horde builds thanks to its fluid combat style.

Final Thoughts

Infernal Hordes in Diablo 4 Season 9 are a true test of build efficiency, AoE dominance, and survival instincts. While any class can succeed with the right setup, the builds listed above offer the best combination of wave-clearing potential and endgame scalability.

·Best for AoE dominance: Hydra Sorcerer.

·Best hybrid burst/sustain: Quill Volley Spiritborn.

·Best tanky beginner build: Pulverize Druid.

·Best semi-passive farmer: Balazan’s Poison Thorns Spiritborn.

·Best control/safety option: Blood Wave Necromancer.

·Best melee DPS: Whirlwind Quake Barbarian.

Whether you’re farming Burning Aether for loot, pushing high-tier challenges, or simply exploring Season 9’s new endgame, these builds will give you the edge you need to conquer the Infernal Hordes. And if you’re looking to fine-tune your setup faster, you can always farm or buy Diablo 4 items like Uniques and crafting mats from trusted trading platforms to complete your build.

Diablo 4: How to Get Rotting Lightbringer

In Diablo 4, the allure of unique and legendary gear drives much of the game’s progression, and players are always on the lookout for powerful items that can help them carve through enemies, increase their survivability, or provide an edge in endgame content. One such item that has captivated the community is the Rotting Lightbringer. This item stands out not only for its powerful abilities but also for its eerie aesthetic and the lore surrounding it.

If you’re a player on the hunt for the Rotting Lightbringer or simply curious about how to obtain this elusive and potent Diablo 4 Items, look no further. In this article, we’ll explore what the Rotting Lightbringer is, the process of obtaining it, and how best to use it to enhance your Diablo 4 experience.

What is the Rotting Lightbringer?

The Rotting Lightbringer is a legendary item in Diablo 4 that combines both light and decay, making it a fitting symbol of the game’s overarching themes of balance between good and evil. Unlike many of the traditional weapons and armor sets, this item is unique for its flavorful design and its powerful in-game effects.

Visually, the Rotting Lightbringer features a decayed, withered appearance, as if it once shone brightly like a beacon of hope, only to have been corrupted by the dark forces of Sanctuary. The item can be associated with the Paladin class, as its effects synergize with themes of holy power, defensive abilities, and the occasional dabbling in necrotic forces, but it’s not restricted to this class alone.

As a weapon or artifact, the Rotting Lightbringer is imbued with powers that allow players to balance the duality of light and decay. It enhances abilities that either weaken enemies or buff allies, and its effects change based on player actions and specific game circumstances. This makes it not only a powerful item but a highly versatile one that can serve different playstyles depending on the situation.

How to Obtain the Rotting Lightbringer

Obtaining the Rotting Lightbringer is no small feat, and its acquisition requires players to complete a series of difficult and time-consuming tasks. The item is not a random drop and requires careful planning, exploration, and battle with some of the toughest adversaries in Diablo 4. Here’s how to get your hands on it:

1. Unlocking the Dark Path Questline

To start your journey toward acquiring the Rotting Lightbringer, you must first unlock a special questline known as the Dark Path. This questline becomes available after completing a significant portion of the main story and reaching the mid-to-late game content.

The Dark Path questline revolves around the exploration of ancient tombs, forgotten shrines, and necrotic ruins scattered across Sanctuary. The area associated with this questline is fraught with peril, as it deals with the forces of corruption and decay. As such, players will encounter necromantic creatures, dark cults, and fallen celestial beings that hold sway over this region.

The Rotting Lightbringer is deeply tied to this questline’s central mystery: a once-sacred relic that has fallen into darkness. Players must investigate the area, uncover the truth behind the fall of the Lightbringer, and defeat key adversaries who guard the path to the artifact.

2. Defeat the Herald of Decay

Once you’ve unlocked the Dark Path questline, you will eventually encounter the Herald of Decay, a massive necrotic boss who holds the key to acquiring the Rotting Lightbringer. The Herald of Decay is an imposing foe who resides in the Rotting Cathedral, a dark dungeon filled with traps, monsters, and decayed creatures.

The Herald of Decay serves as the final challenge in this questline and is the gatekeeper to the Rotting Lightbringer. The battle is intense, requiring players to contend with multiple mechanics that focus on necrotic energy and shadow manipulation.

Boss Mechanics:

Phase 1: Shadow Blight – The Herald uses shadow magic to create AoE zones that drain life from players standing in them. These zones must be avoided, as they inflict necrotic damage over time.

Phase 2: Minion Summoning – The boss summons decayed minions that inflict both damage and disease effects on players. These minions must be dealt with quickly before they overwhelm the party.

Phase 3: Decay Empowerment – As the fight progresses, the Herald of Decay enters an empowered state, gaining increased damage output and healing from any nearby decayed remains.

Once the Herald of Decay is defeated, the Rotting Lightbringer will drop as a legendary reward. However, it’s important to note that while the mask is a common drop, there is no guarantee that you will receive it immediately. The drop rate can vary depending on your difficulty level, and you may need to defeat the boss several times to get the Rotting Lightbringer.

3. Crafting the Rotting Lightbringer

If you fail to acquire the Rotting Lightbringer after defeating the Herald of Decay, don’t fret. There’s another way to obtain the item through crafting. After defeating the Herald of Decay, you will receive an ancient shard or decayed relic that can be used to forge the Rotting Lightbringer at the Mystic or Blacksmith.

To craft the item, you’ll need to gather additional materials, such as shadow-infused crystals, soul remnants, and necrotic dust. These materials can be obtained by completing side quests, defeating necrotic-themed enemies, or participating in world events. Once you’ve acquired the necessary cheap Diablo 4 materials, head to a crafting station, and select the Rotting Lightbringer option to forge your very own.

4. Special Event Drops

While the primary method for obtaining the Rotting Lightbringer is through the Dark Path Questline and defeating the Herald of Decay, there are also special world events where the item has a chance to drop. These events, which often take place in necrotic zones or during dark ritual encounters, provide opportunities for players to challenge powerful elite enemies or world bosses.

These events are random and can only be accessed during specific times or locations, so keep an eye on the world event schedule to know when the chances for Rotting Lightbringer drops are high.

What Makes the Rotting Lightbringer Special?

The Rotting Lightbringer is not just a cosmetic item—it comes with a host of powerful in-game benefits that make it a highly sought-after piece of gear. Below are some of the key benefits of using this item:

1. Balance of Light and Decay

One of the core features of the Rotting Lightbringer is its ability to provide a balance between holy and necrotic energies. This makes it an ideal item for classes that require both offensive and defensive bonuses. It can be especially beneficial for Paladins, Sorcerers, and Necromancers, as it amplifies both light-based spells and dark magic abilities.

2. Enhanced Damage Resistance

The Rotting Lightbringer offers resistance to necrotic, shadow, and poison damage. In the game’s later stages, these damage types are often used by elite enemies and world bosses, making this armor set invaluable for surviving against some of Diablo 4’s most dangerous adversaries.

3. Offensive Buffs

In addition to its defensive benefits, the Rotting Lightbringer provides an offensive buff to all light-based spells and holy damage abilities. This makes it perfect for Paladins and cleric-like builds that focus on healing and buffing allies while simultaneously delivering powerful light attacks. It also synergizes well with other gear that boosts critical damage or elemental resistances.

4. Unique Appearance

Visually, the Rotting Lightbringer stands out as a piece of decayed relic armor, with eerie light emanating from cracks in its surface. This appearance adds to its mystique, making it one of the most visually striking pieces of gear in Diablo 4.

Conclusion

The Rotting Lightbringer is a legendary and unique item that embodies the theme of balance between light and decay in Diablo 4. Its acquisition requires patience and skill, as players must navigate the Dark Path Questline, defeat the Herald of Decay, and possibly engage in crafting or special event runs. Once obtained, the Rotting Lightbringer provides a powerful mix of offensive and defensive abilities, making it a key asset for Paladins, Necromancers, and other players looking to harness the power of both holy and necrotic forces.

For those brave enough to venture into the dark and decayed corners of Sanctuary, the Rotting Lightbringer offers a chance to wield a unique and potent artifact, making it an essential item for endgame content.